QIACHIP 433 MHz AC 110V 220V 2CH RF Remote Control Switch Controller + Universal RF Relay Receiver For Light Garage Door Opener
- I am an international seller,100% brand new and of high quality
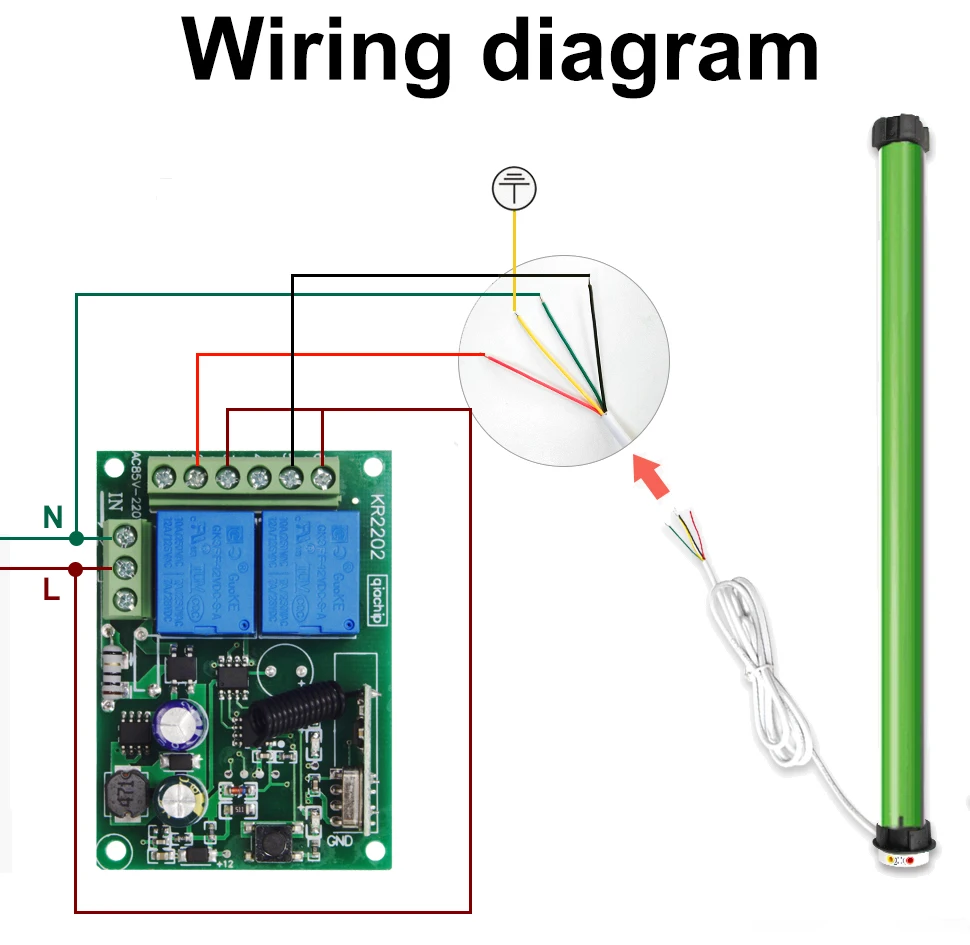
Our shop sells the most popular 3C consumer electronics products,such as mobile phone accessories,computer accessories,game peripherals,smart wearables,and follow the most popular fashion trends. If you like our products,please follow us,become our follower and fan.We will provide you with the most popular products to satisfy your fashion shopping experience.Support APP : NoFrequency : 433 MHzChannel : 2Package : YesModel Number : KT05-AB-4+KR2202-4Wireless Communication : RFUse : Universal,Lighting,Electric Door,Automated curtains,SWITCHBrand Name : QIACHIPOrigin : Mainland ChinaCertification : CEInput voltage : 220VWorking current : 10AMaximum load power : 1100W x 2Frequency : 433MhzSupport ening format : EV1527Wiring method : NC COM NOWorking mode : Momentary, Toggle, Latching Time delayRF 433 Mhz Wireless Remote Control Switch Relay 220v 2 channels Receiver and Transmitter for Motor Garage Door Gate CurtainTechnical Data Of Receiver:Model Number:KR2202-4Input voltage: 220VWorking current: 10AMaximum load power: 1100W x 2Frequency: 433MhzSupport ening format: EV1527Wiring method: NC COM NOOperating Mode You can match the Remote Control with the Receiver Switch Module in 3 modes. Remote mode 1: Momentary Mode Press and hold on one button -> ON; Release the button -> OFF Details:Press one button (on the remote control) , the relay (on the receiver board) turn to switch-on ;Release the button, the relay turn to switch-off . Remote mode 2: Toggle Mode Press one button -> ON; Press the same button again -> OFF Details:Press one button (on the remote control) once , the relay (on the receiver board) turn to switch-on ;Press the same button again , the relay turn to switch-off. Remote mode 3: Latched ModePress button "A" -> ON; Press button "B" -> OFF(at the same time another channel ON) Details:Press one button (on the remote control) once, the relay (on the receiver board) turn to switch-on ;Press the another button, the relay turn to switch-off( at the same time another channel ON ). Set Up - Part 1:Delete the existing data about remote mode Note: When you receive our products, it maybe set in one remote mode randomly, that because each product got test when it can be arranged to shipment.So, please delete the existing data about remote mode for the first application. Press the learning button on the Receiver Switch Module board 8 times , the existing data are deleted successfully.After deleted the data, all the remote control cannot work any more. - Part 2: Set up the Remote Mode Set up : Momentary Mode STEP 1Press the learning button on the Receiver board once.Wait for a moment , the LED will turn off , indicating you entered the learning state. STEP 2Press one button on the Remote Control , the LED on the receiver board will flash on then off indicating the button was learned. STEP 3Press another button on the Remote Control, watching the LED go on and off again.Wait 3 seconds, the LED will turn on again, indicating system is ready for use. Set up :Toggle Mode STEP 1Press the learning button on the Receiver board twice.Wait for a moment , the LED will turn off , indicating you entered the learning state. STEP 2Press one button on the Remote Control, the LED on the receiver board will flash on then turn off , indicating the button was learned. STEP 3Press another button on the Remote Control , watching the LED go on and off again.Wait 3 seconds, the LED indicator will turn on again , indicating system is ready for use Set up :L atched ModeSTEP 1Press the learning button on the Receiver board 3 times. STEP 2Press one button on the Remote Control, STEP 3Press another button on the Remote ControlWait 3 seconds, the LED indicator will turn on again , indicating system is ready for use


/product/49/6922991/1.jpg?3795)